Tuesday�, January 29th�, 2013
Whether one is doing a kitchen remodel or starting from scratch, the lighting design is frequently the last thing considered and often the first thing to get cut from the budget. Design and planning should be phase 1 of a kitchen project whether you are starting from scratch or remodeling. If you want your lighting to look like it was done by a pro, choosing the right light and the right placement of the light will make all the difference in the world. And, these decisions need to occur in the initial stage of the project and not as a 'hindsight is 20-20' kind of thing.
Lighting designers say that using three types of lighting functions is paramount to good lighting design-whether it is in your kitchen or elsewhere. It is a 'layering' technique:
1) general light source
2) task lighting
3) drama or accent lighting (also known as focal lighting)
Some designers like to incorporate dimming systems in their lighting design. Our designer recommends that dimming systems be avoided in most cases-with the exception of dining rooms and media rooms. Here are some reasons why a dimming system should be avoided: 1) color temperature shifts 2) bulb does not dim in the full range and will drop out around 15-20% 3) flickering. Halogen bulbs experience color temperature shifts when being dimmed-not to mention that they require more energy to run and create unwanted heat. Fluorescent bulbs do not have a filament-which translates to it not being conducive to being dimmed-they drop out at 15-20%-which in turn, does not give you the full range. Fluorescent bulbs will also flicker when being dimmed. LEDs do not have a filament either, and suffer from the same things that fluorescent bulbs do; dropping out at 15-20% and flickering. Flickering is a bigger deal than one would initially think: it can cause neurological disturbances, headaches, fatigue, eye strain, affects your perception of motion and is a distraction, to name a few of the problems. Hopefully, we've succeeded in talking you out of using a dimming system.
You can achieve a more pleasing effect by using the layering technique. You can also keep your lighting costs down by using fixtures that can perform multiple functions.
General Light Source
6" recessed cans are a great choice for the general lights-and will give you the most choice by way of lamps/bulbs that fit into the fixture. When I did a kitchen remodel in my own home in 2008, LED lights for 6" recessed had just been introduced to the market. Yes, initially, LED bulbs cost more than their counterparts. However, I have no regrets to making that choice. For one, it takes less energy to have it on and keep it on. The bulbs provides up to 60,000 of continuous light that is cool burning nor does it have to warm up first. No other bulb can do that! LED is also the most 'green' choice you can make in keeping your carbon footprint down. Initially, we tried out LED bulbs that had a color temperature of 27K. We found these to look too 'yellow' and ended up going with a brighter, slightly cooler color temperature of 30K. Much better!

LED 6" recessed kitchen lights
Here is an example in my kitchen with just some of the recessed lights on-this is my 'everyday' lighting choice. The lights are LED bulbs in 6" recessed cans (my camera did yield some unwanted lens flare from pointing up in to the lights-those reflections are not really there on the ceiling).
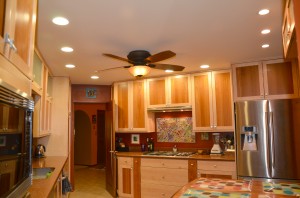
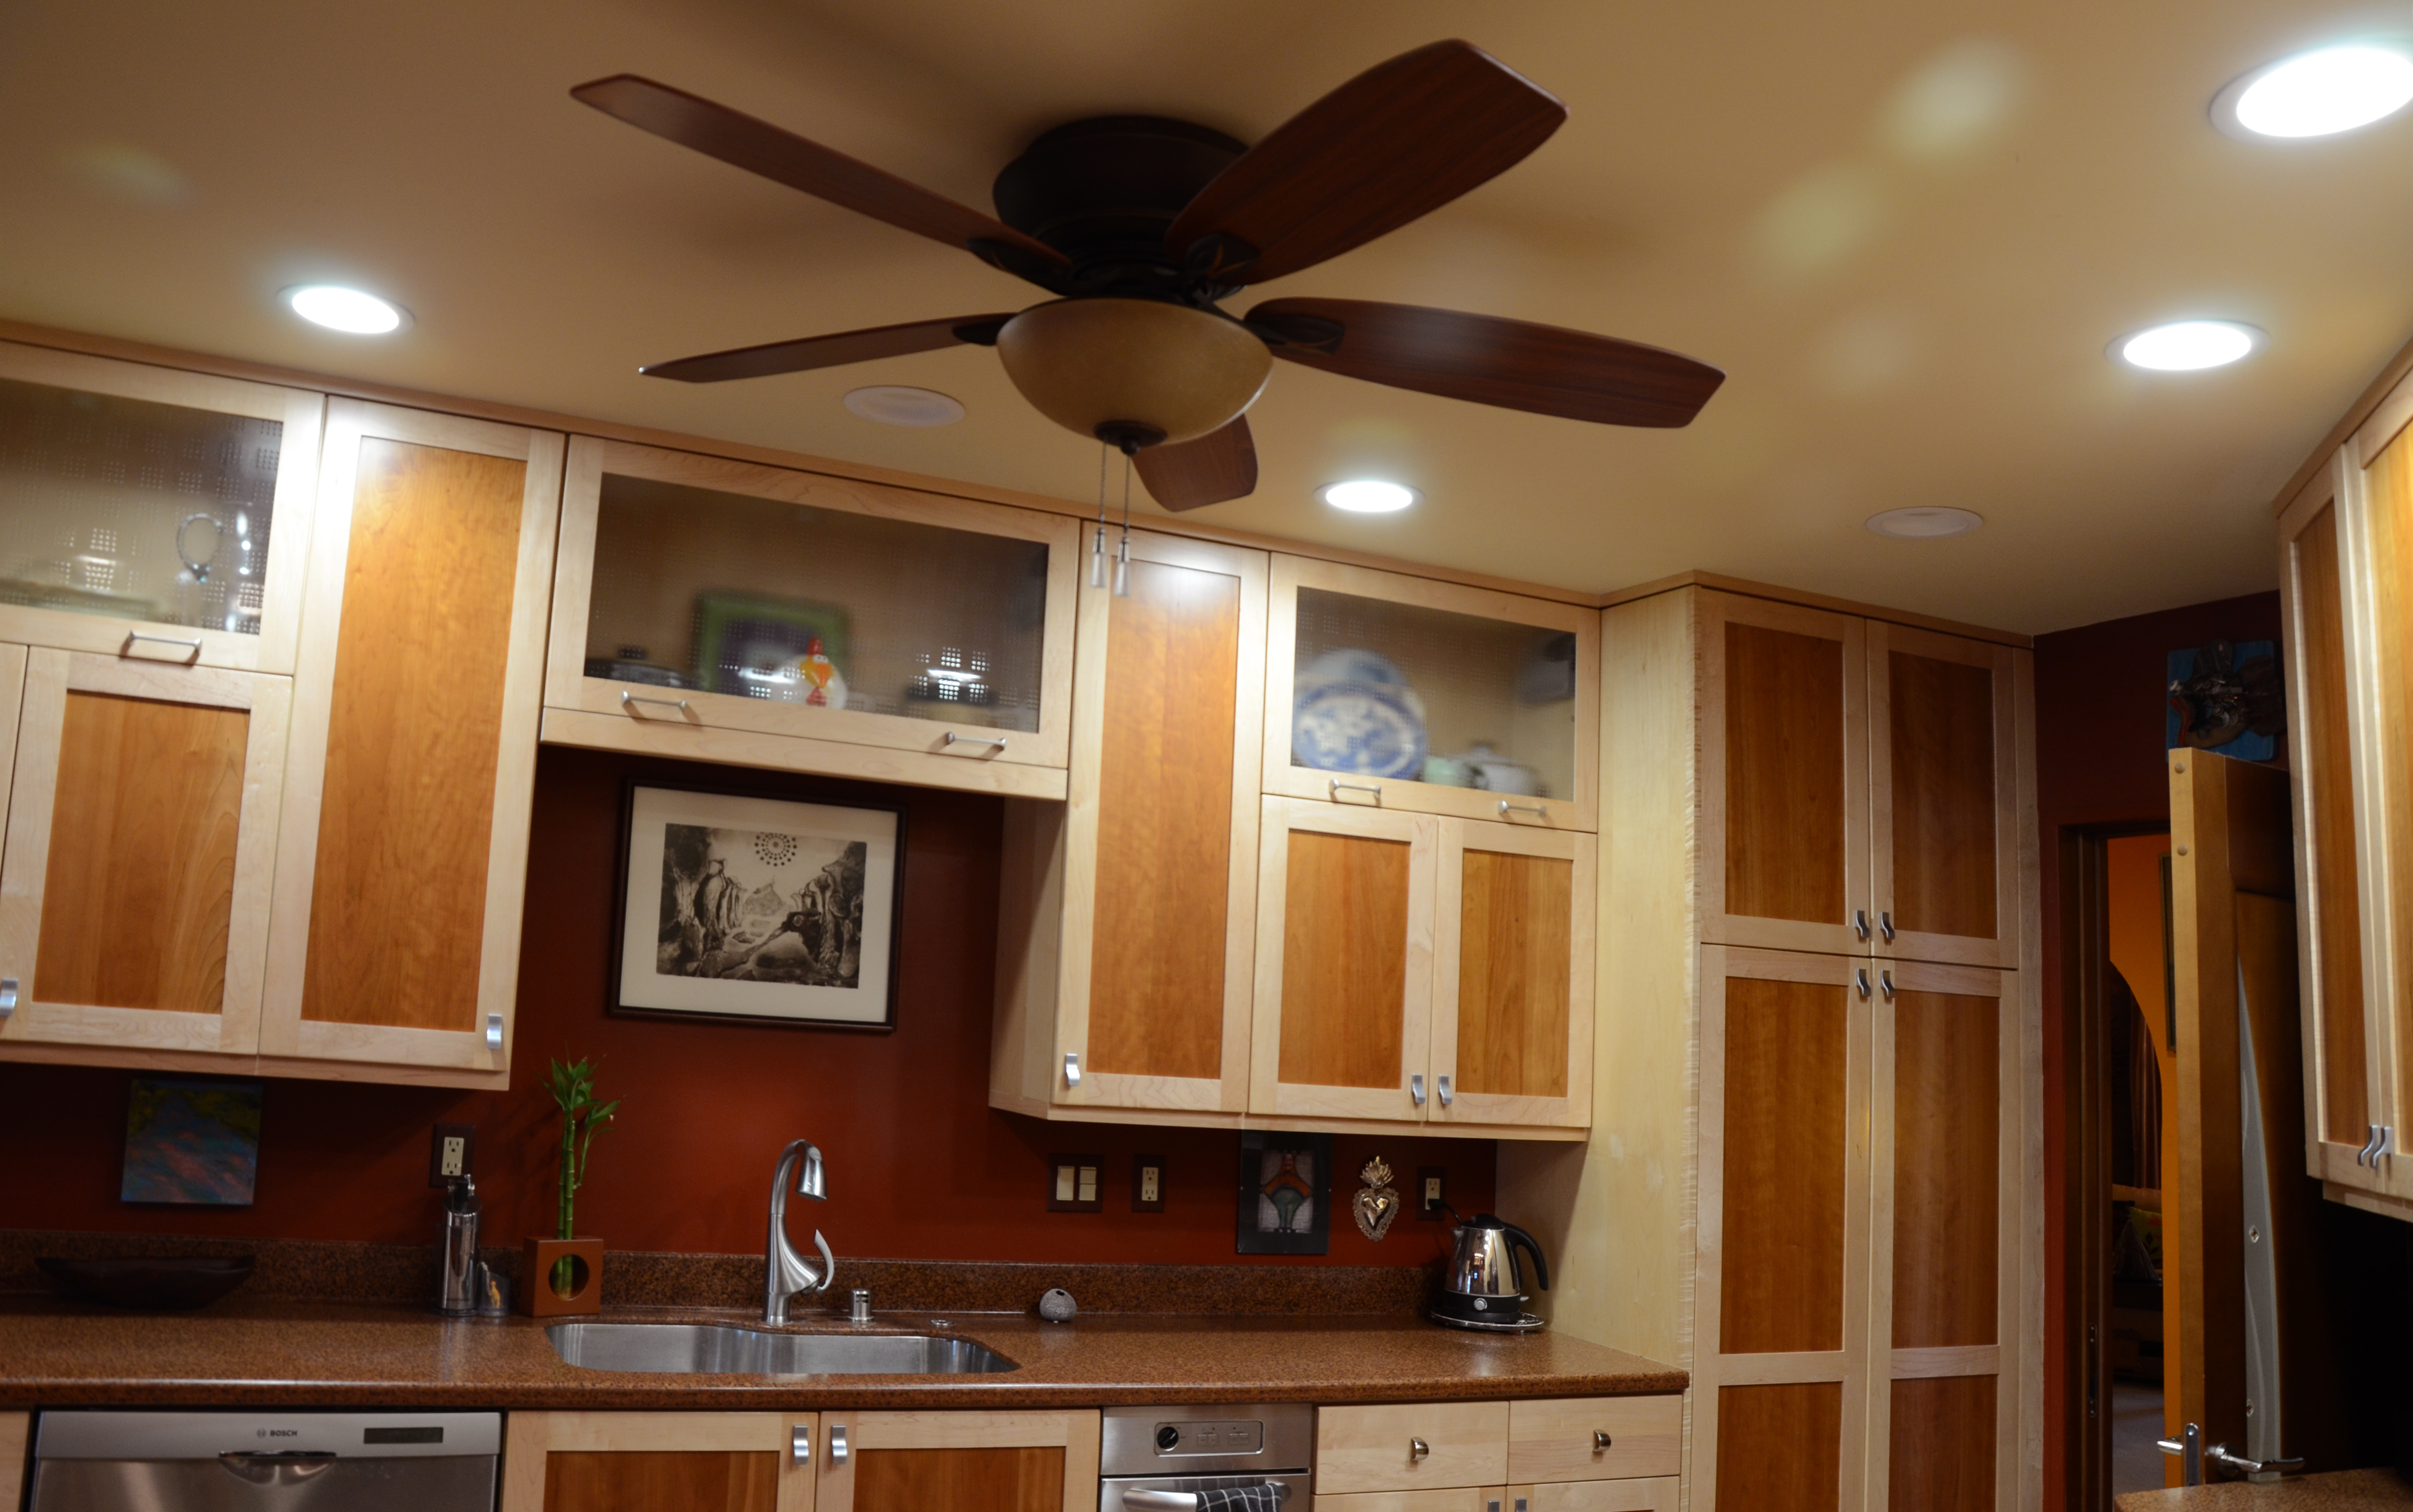
LED 6" and 4" CFL recessed kitchen lights
In this example of my kitchen lighting, I have all of the recessed lights on. All decisions for the lighting source and placement were intentional. We looked for a light that had a broad, white, diffused, bright, even light-one that did not have 'edges' to the beam spread. This reduces the shadows on the work surfaces and the amount of glare. The LED lights we chose met that criteria. Track lighting was not a good choice because it is harsh, directional and creates lots of shadows. It wasn't appropriate for our application (you might have call for a directional light in your kitchen layout, however).
My lighting designer wanted all my work surfaces to be evenly lit. Notice the distance of the recessed lights in relation to the cabinets. They are place 18" out from the cabinets so that it would light the cabinets and allow the light to light the inside of the cabinet when opened. This distance also minimized shadows cast in the area of the work space when standing at the counter. The space between each recessed light is about 2 feet-allowing for a well lit room. Notice too, that one is placed over the doorway.
Look carefully at the bank of recessed lights above the table (far top right of image). These are 4" shower trims with a CFL bulb in each of them. "Why shower trims?", you ask. Shower trims were selected because of the glass insert is frosted (esthetics) and shower trims are offered in many attractive trims. Using the 4" trims also breaks things up and adds interest-we didn't need as much light over the table area.
With the 6"recessed cans, our lighting designer put them on two switches so that you could just have some on and at other times, have them all on when you want it to be brighter. That provided two levels of general lighting.
Task Lighting
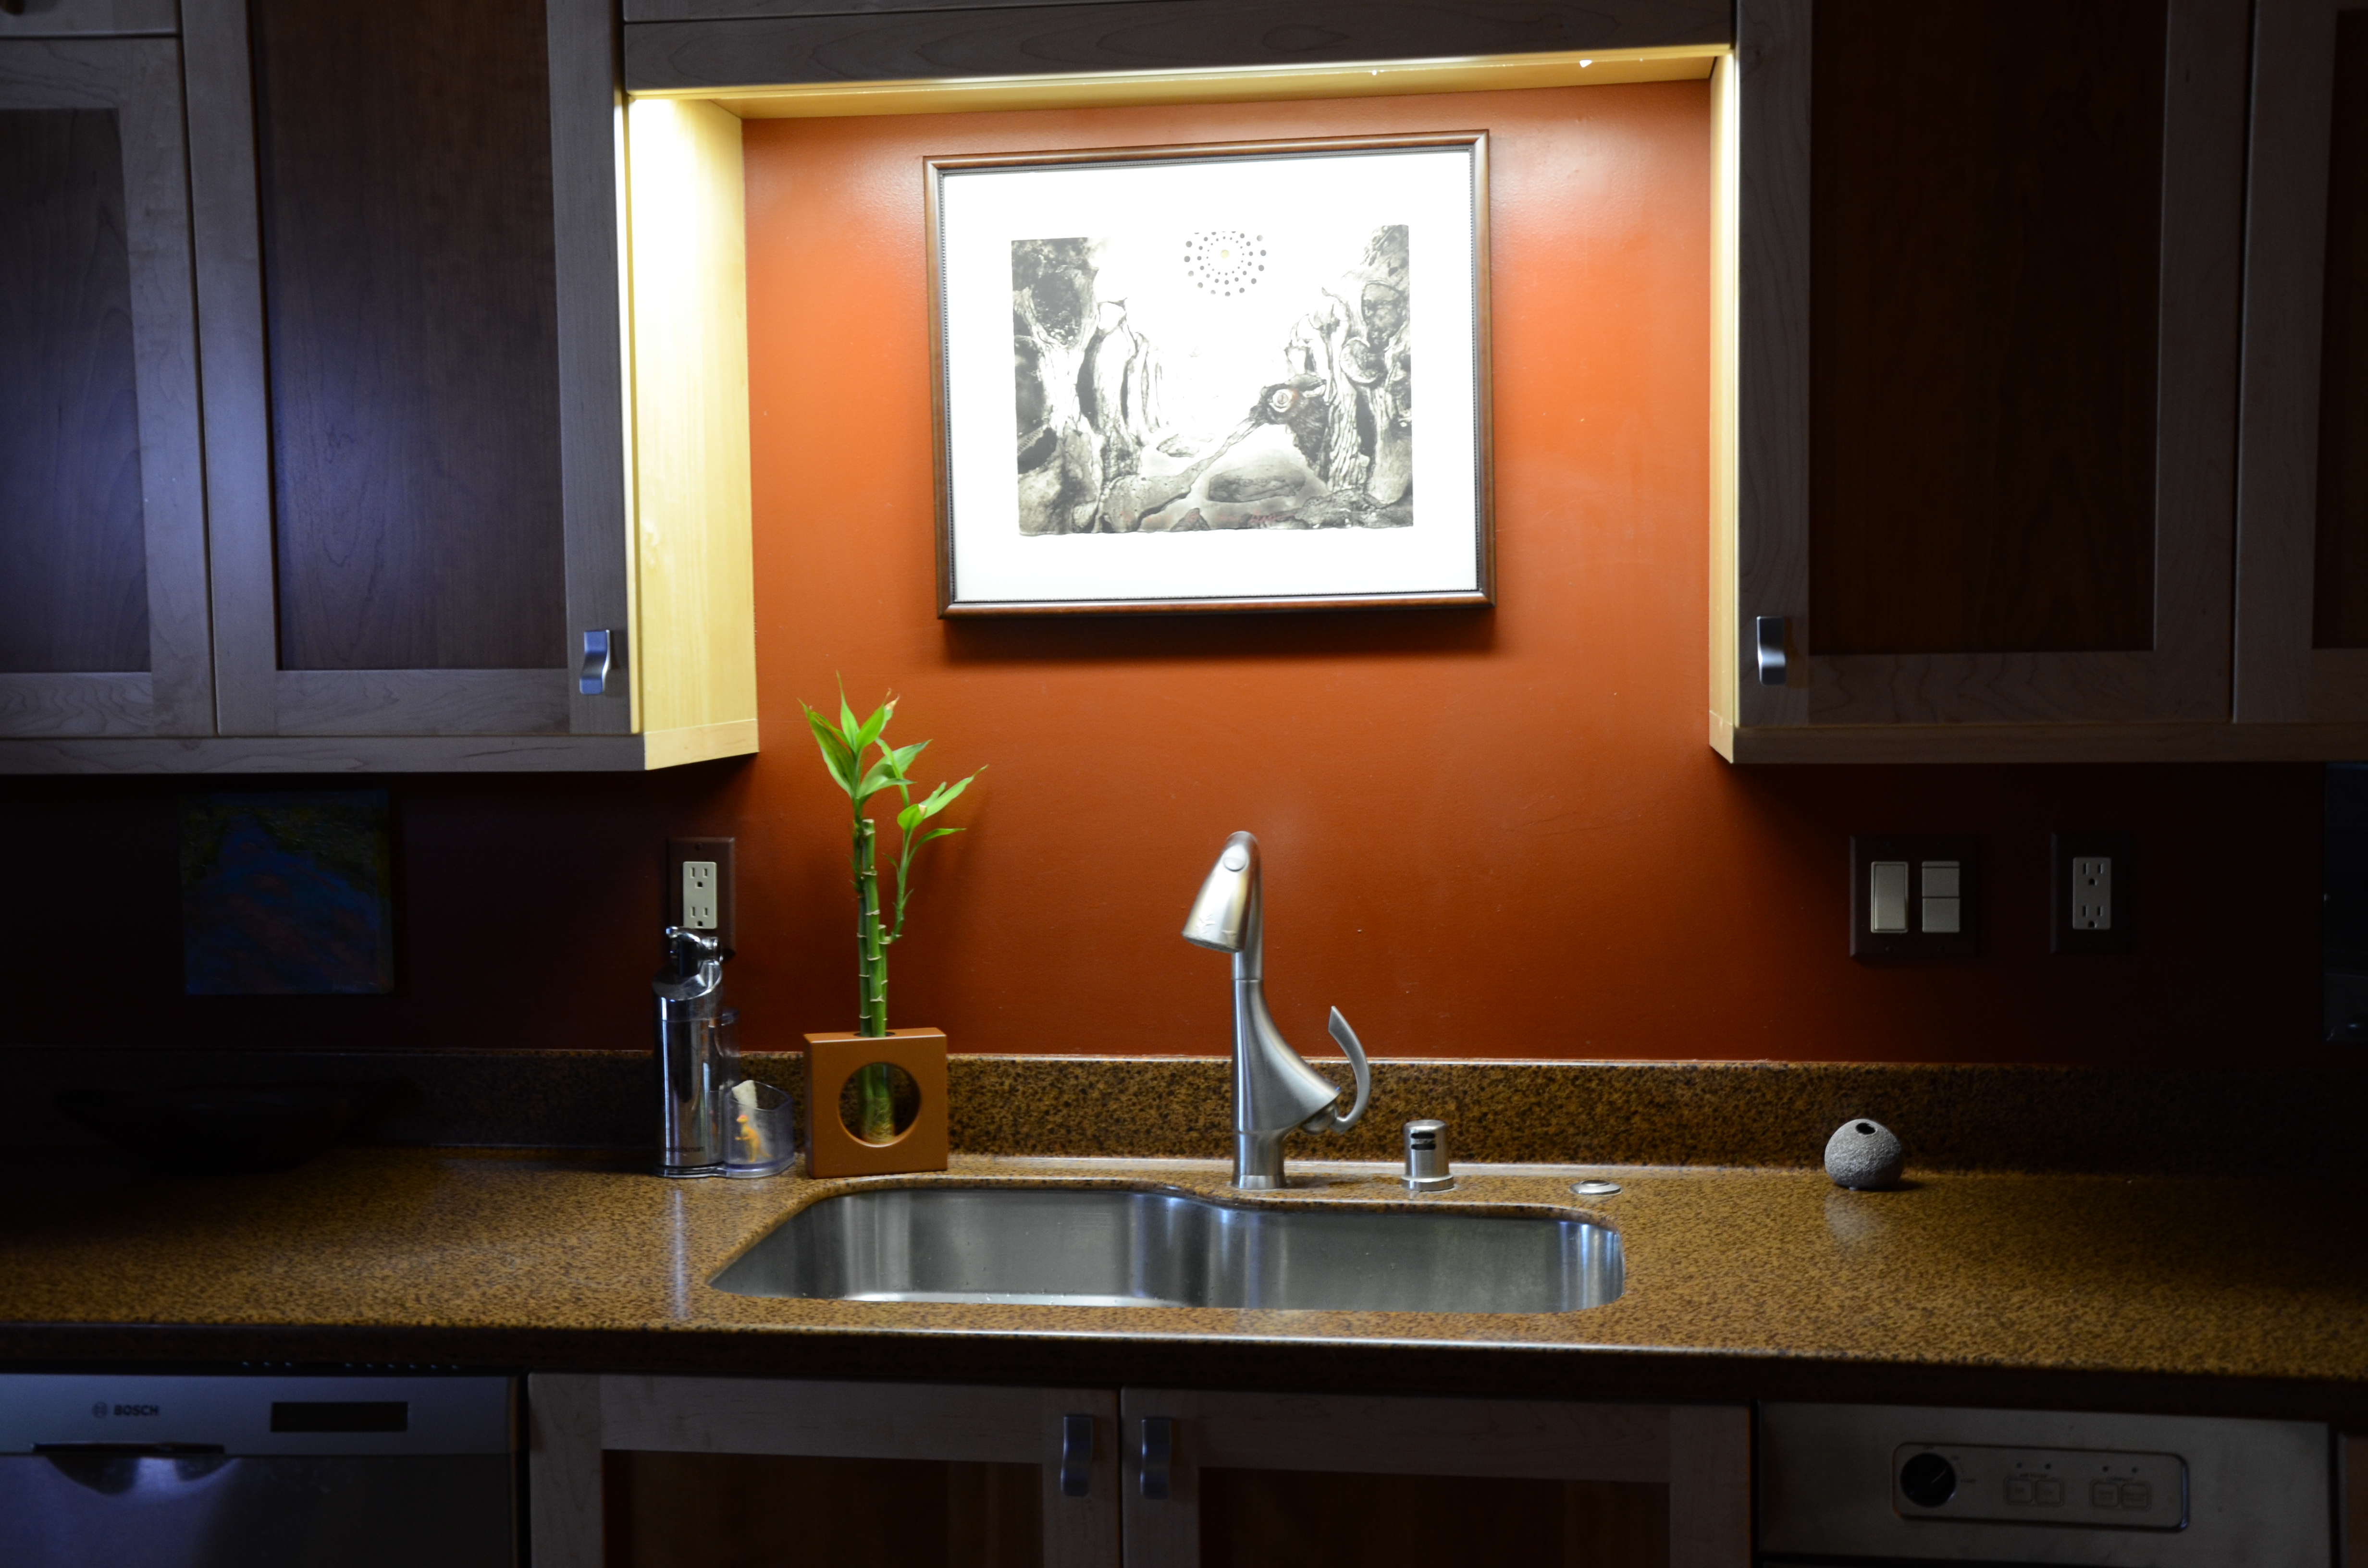
The next layer of lighting in my kitchen is task lighting. Right above my kitchen sink is a light to provide me with an additional layer of light-by way of a fluorescent fixture.

kitchen sink task light
Fluorescent light fixture over the kitchen sink for additional task lighting (I turned the general lighting off so that you can see this light source better).
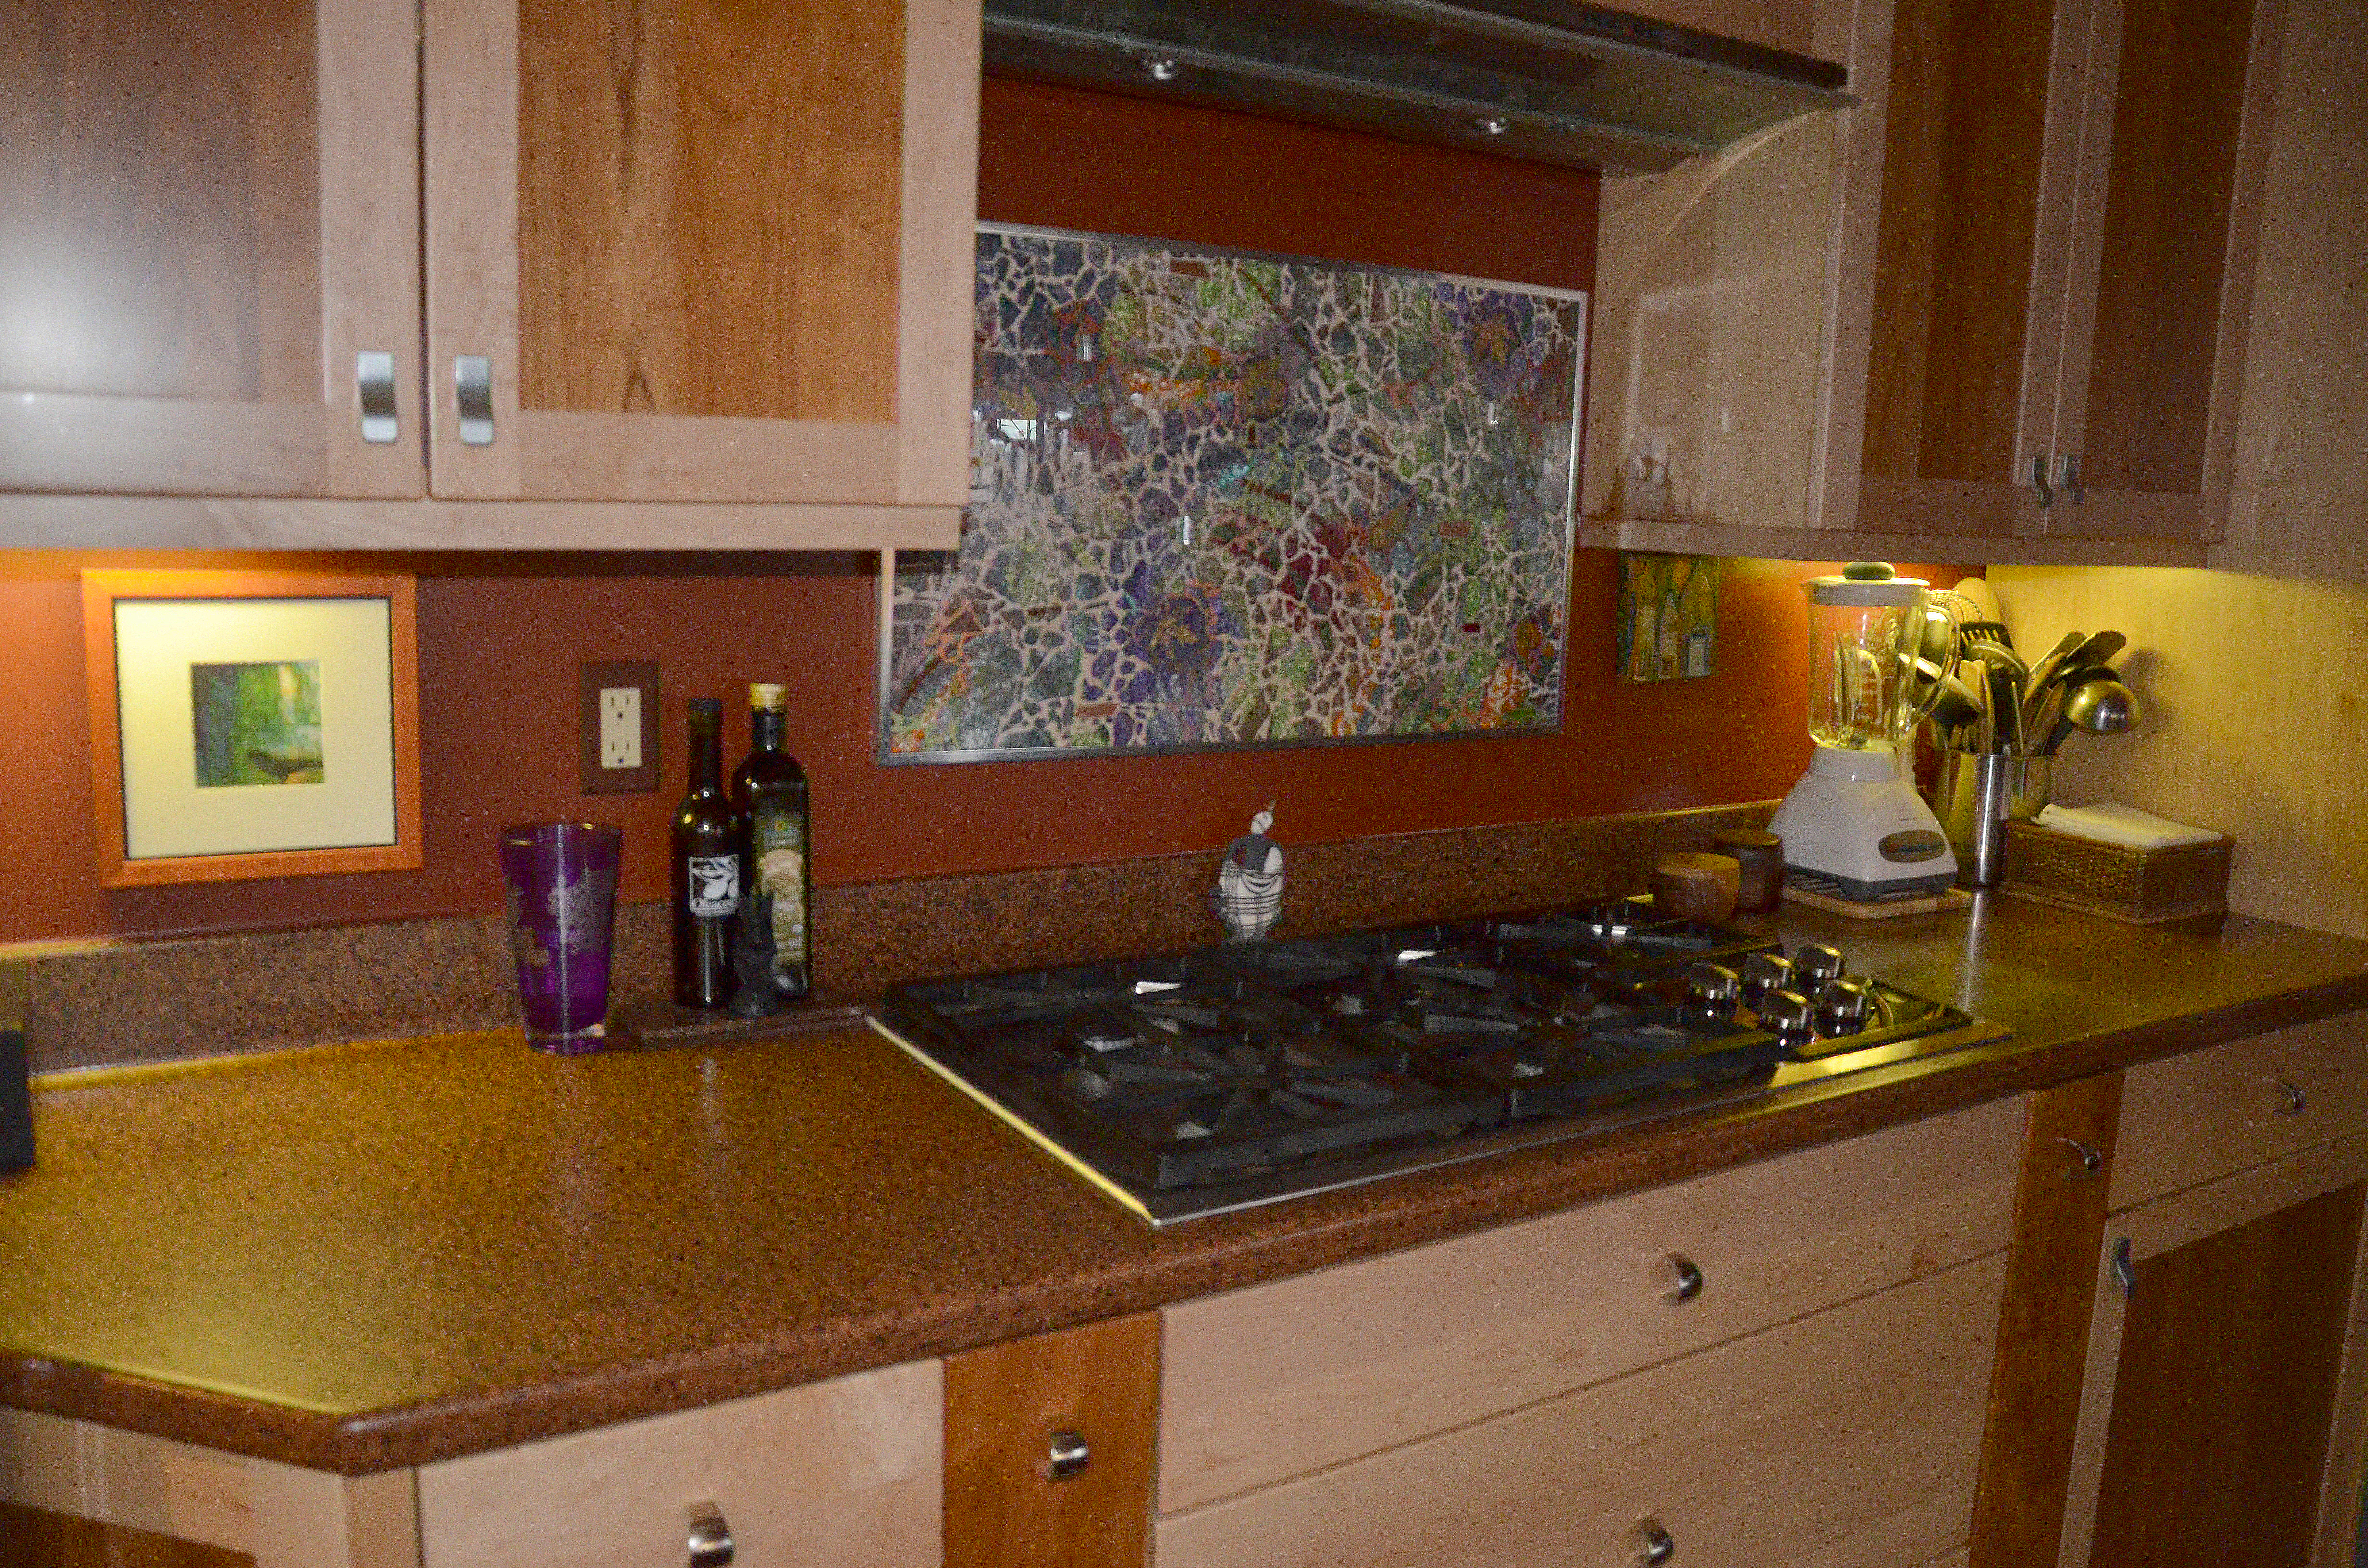
My stove top area also has two MR-16 halogens (soon to be switched over to the SORAA LED MR-16).

task lighting over the stove top area achieve by way of halogen MR-16s
Additional task lighting over the stove top achieved by way of two MR-16 halogen lights.
Accent Lighting (for added drama)
Accent lighting in my kitchen was achieved by way of additional fixtures under the cabinets (and how I wish the LED under cabinet fixtures were available then-instead I have fluorescent fixtures). The LED under the cabinet fixture is a great choice over a fluorescent since it lasts longer, is more energy efficient AND has a lower profile. Not to mention that the color rendering is much better. However, most LED under the cabinet fixtures require special wiring and hiding a transformer-not something that is easily done after the fact. Had this product been available when I did my kitchen remodel, I would have included it in the design. The LED under the cabinet is a specular light source-it gives an added dimension that a fluorescent bulb cannot. Think of it as adding more 'bling'.

under cabinet lighting
Under cabinet lighting achieved here by way of fluorescent fixtures.
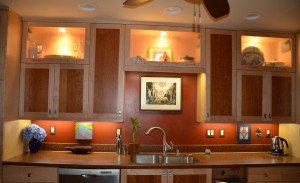
cabinet lighting specials
Pictured here are the fluorescent under the cabinet lights and MR-16 halogen lights in the upper cabinets. We do experience a problem with the halogen MR-16's in the cabinet-even when using the lowest wattage of 20 watts, over time, heat builds up in the cabinet and the lights go out. On our list of things to do is to replace it with a 1-3 watt LED MR-16 which will easily remedy the situation.
Of course, it goes without saying, that if you have natural light to work with, by all means incorporate that in to your lighting design. Natural light always makes a home more appealing. When trying to achieve natural lighting with lighting fixtures, be sure to use bulbs that are described as 'daylight' instead of those described as warm-that way the color temperature is more closely matched.
Hopefully, by sharing what went in to the decision making process for lighting choices in my kitchen remodel, you will have at least a better starting point. Avoid using a dimming system and avoid trying to light the entire room with just one light source such as a ceiling mounted fixture. Please feel free to contact us for solutions to your lighting challenges-we are here to help!
If you found this article to be helpful, please send us your before and after photos and a brief description of your experience-we'd love to share your success story!
 We have made this video to help make your transition to Recessed Led Retrofit Trim Modules smooth and easy. See how to identify your recessed housing can from a wide and growing list of recessed cans we have collected over the years. Know confidently if your recessed downlight can be converted. Now lets get started ?

 e problem was that the recessed can had a floating / suspended socket that dangled from the housing requiring it be attach to the trim. The recessed trim his customer purchased was not designed to have the socket attach to it. Thankfully he found us online and contacted us right away. Turns out our 6" recessed lighting socket plate with attachment screw would work perfectly. Our recessed can parts saved the day saving him time and money over alternative solutions.